Hvorfor korrelerer min DC-spænding med solen?
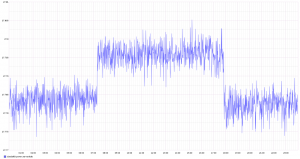
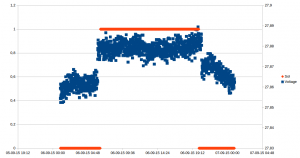
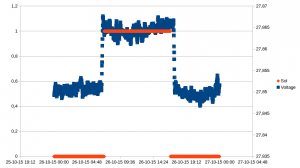
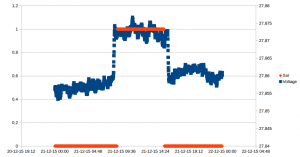
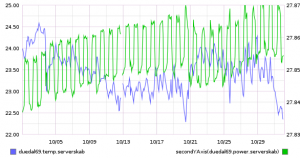
I mit home-monitoring setup har jeg en AC-DC strømforsyning der laver DC-strøm og lader UPS-batterierne. Denne spænding overvåger jeg, som beskrevet i sidste blogindlæg. Grafen set for en typisk dag ser ud som ovenover. Der er en tydelig stigning i spændingen om morgenen og et tydeligt fald sidst på eftermiddagen. Det korrelerer forbavsende godt med hvornår solen står og og går ned. Her er data for 3 forskellige dage, overlagt med sol op-/ned-tidspunkt:
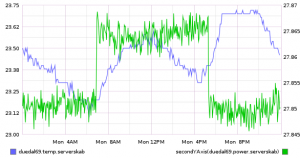
Der er ikke noget forbundet til DC-forsyningen der trækker væsentlig forskellig strøm efter belastning (det der er forbundet er switche, router og Arduinoer), og intet der tænder/slukker efter tidspunktet. Temperaturen varierer ikke væsentligt i rack-skabet, og korrelerer ikke med spændingen:
Så det store spørgsmål er: Hvorfor korrelerer min DC-spænding med solen? Er det pga. solceller i nabolaget? Er det pga. gadebelysning der tænder/slukker? Gode bud modtages 🙂
Measuring high DC supply voltage with an Arduino
For my home-monitoring setup I would like an Arduino to measure the supply voltage it is getting from a DC battery UPS (Uninteruptible Power Supply). Unfortunately (actually by design, but that’s another story), the power supply is 24V, which means it will put out anywhere from 21.3V-29.8V (according to the manufacturer), which is far too much to measure with the Arduino’s 0-5V input range. For simplicity’s sake, lets assume we want to measure a 20-30V voltage.
The immediate answer is to use a voltage divider, which will bring a voltage in the 0-30V range into the 0-5V range. The general formula for the resistor divider is:
![]()
We want ![]() to give
to give ![]() , so
, so
![]()
Now, just as a sanity check we should calculate the current of the resistor divider, to make sure we’re not converting too much electricity into heat. Ohm’s law gives us
![]()
which in this cases gives
![]()
No problems there.
This works okay, but we lose a lot of precision, as only ~1/3 of the Arduino’s range is actually used: the Arduino’s ADC has 1024 different readings between 0-5V, so when reading the 0-30V range the precision is just about
![]() over the range.
over the range.
If only we could move the lower bound, so that 20V would map to 0V on the Arduino. A wild Zener Diode appears! One use of a Zener diode is as a voltage shifter.

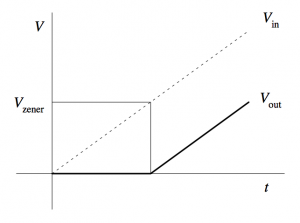
Zener diode voltage shifter
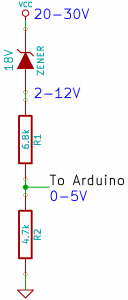
The closest Zener diode I could find was an 18V of the BZX79 series. This resulted in the following circuit:
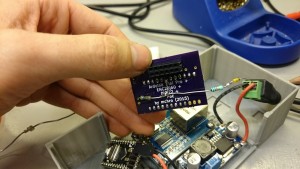
which I hacked into my Arduino box.
Now, theoretically the formula for translating an voltage at the Arduino to the supply voltage should be:
![]()
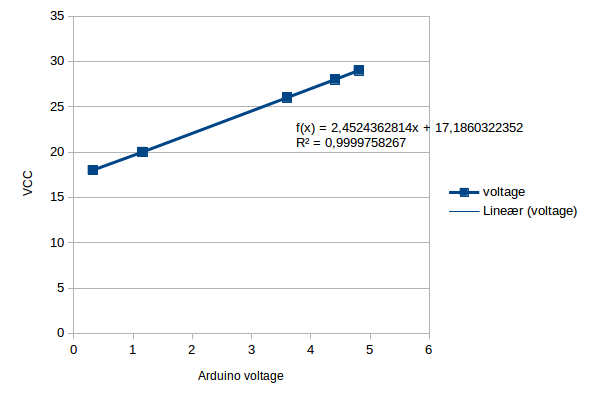
I then did some quick measurements of various input voltages and the resulting voltage at the Arduino pin:
| Input voltage | Arduino pin |
| 18V | 0.32V |
| 20V | 1.16V |
| 26V | 3.60V |
| 28V | 4.41V |
| 29V | 4.81V |
Plot it into a spreadsheet, create a graph and add a linear regression gives:
Now, this formula is a bit different compared to the theoretical one, mainly in the Zener diode drop. However, the datasheet for the BZX79 actually has the 18V C-type (![]() ) as between 16.8-19.1V, so this is well within spec. Since this is just a one-off, I’m happy to just use the measured formula, as this will be more accurate.
) as between 16.8-19.1V, so this is well within spec. Since this is just a one-off, I’m happy to just use the measured formula, as this will be more accurate.
The final precision should be ![]() . The current should be around
. The current should be around ![]() , which again is ok.
, which again is ok.
Roomba 500-series Easy Scheduling using an Arduino
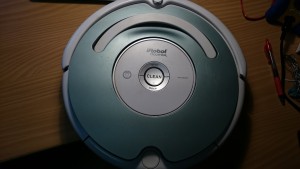
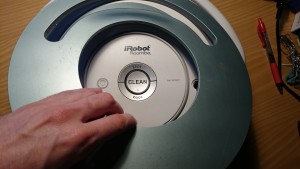
I have a iRobot Roomba 500-series vacuum cleaner robot, but without any remote, or command center or anything; alas, I have to push a button everytime I want the cleaning revolution to start 🙁
But no more! It turns out the Roomba can be programmed, quite easily, to schedule automatically, and all you need is:
- 1 Arduino
- 2 wires
The Roomba actually supports a serial protocol, the iRobot Roomba 500 Open Interface Specification, that allows remote control, driving, sensoring, and scheduling.
Finding the serial port
Remove the plastic cover. It is easiest to remove the vacuum bin, and carefully pry it off with a screwdriver.
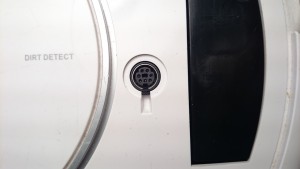
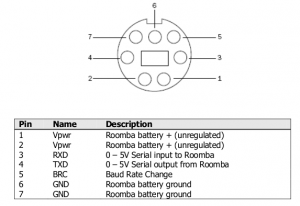
There should be a 7-pin plug, on the right side. It has the following pinout:
Program the Arduino
Use this sketch (download: roombaschedule.ino):
/*

Set a schedule on an iRobot Roomba 500 series, using just an Arduino.

Mads Chr. Olesen, 2015.

*/
const byte currentDay = 3;
// 0: Sunday, 1: Monday, 2: Tuesday, 3: Wednesday, 4: Thursday, 5: Friday, 6: Saturday
const byte currentHour = 2;
const byte currentMinute = 58;
// Schedule
const byte SUNDAY = 0x01, MONDAY = 0x02, TUESDAY = 0x04, WEDNESDAY = 0x08, THURSDAY = 0x10, FRIDAY = 0x20, SATURDAY = 0x40;
const byte daystorun = SUNDAY | MONDAY | WEDNESDAY | FRIDAY;
const byte times[14] = {
3, 0, // Sunday time
3, 0, // Monday time
3, 0, // Tuesday time
3, 0, // Wednesday time
3, 0, // Thursday time
3, 0, // Friday time
3, 0, // Saturday time
};
const int ledPin = 13;
void setup() {
Serial.begin(115200);
pinMode(ledPin, OUTPUT);
digitalWrite(ledPin, 0);
Serial.write(128); //Start
delay(1000);
Serial.write(131); //Safe mode, turns off Roomba light
delay(1000);
Serial.write(128); //Start, back to passive mode
delay(500);
//Set day time
Serial.write(168);
Serial.write(currentDay);
Serial.write(currentHour);
Serial.write(currentMinute);
delay(500);
//Set schedule
Serial.write(167);
Serial.write(daystorun);
for (int i = 0; i < 14; i++) {
Serial.write(times[i]);
}
}
void loop() {
digitalWrite(ledPin, 1);
delay(1000);
digitalWrite(ledPin, 0);
delay(1000);
}
You need to modify the variables at the top: set currentDay, currentHour, currentMinute according to the present time.
The pre-programmed schedule is to clean at 03:00 on Sunday, Monday, Wednesday and Friday. You can change this if you wish, by altering the daystorun and times variables.
If you don’t modify the schedule, the Roomba should start automatically after 2 minutes.
Put it all together
You should now have a partially undressed Roomba, and a programmed Arduino. Now it is time to connect them. With both unpowered, connect the following:
- Arduino GND to Roomba ground (pin 6)
- Arduino TX (pin 1 on e.g. Uno) to Roomba RX (pin 3)
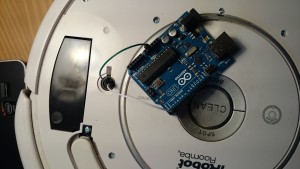
It should look like this:
Now, the moment of truth. Press the “CLEAN” button on the Roomba, the light should go on. Plug in the USB for the Arduino. The Roomba light should turn off briefly, and after a few seconds the Arduino should blink it’s LED. The schedule is now programmed, all done!
Brother DS-620 on Linux
UPDATE: The drivers were temporarily unavailable; they seem to be up again, at least on the Brother US site: http://support.brother.com/g/b/downloadlist.aspx?c=us&lang=en&prod=ds620_all&os=128
I recently bought a Brother DS-620 document scanner that supposedly had support for Linux. It turns out it did, but only after a few quirks. I installed the official Linux drivers, and tried to scan a document using a GUI scanning application. Things were hanging and generally very unresponsive. I checked with the SANE command line tools, e.g. “sane-find-scanner”. It turns out things were indeed working, albeit very slowly. In dmesg I found a lot of messages like:
Jan 29 22:52:13 mchro-laptop kernel: [39172.165644] usb 2-1.3: reset high-speed USB device number 32 using ehci-pci

Jan 29 22:52:13 mchro-laptop kernel: [39172.333832] usb 2-1.3: reset high-speed USB device number 32 using ehci-pci

Jan 29 22:52:13 mchro-laptop kernel: [39172.501677] usb 2-1.3: reset high-speed USB device number 32 using ehci-pci

Jan 29 22:52:13 mchro-laptop kernel: [39172.669712] usb 2-1.3: reset high-speed USB device number 32 using ehci-pci

Jan 29 22:52:13 mchro-laptop kernel: [39172.837679] usb 2-1.3: reset high-speed USB device number 32 using ehci-pci
repeating several times every seconds. At this stage I was thinking that the Linux support was very crappy. After quite a lot of mucking around playing with capturing USB packets using Wireshark, it seemed the device itself was requesting a reset, and the Linux kernel was resetting it approximately 200ms later. Reading some Linux source code, and playing with USB quirks in Linux solved nothing.
Finally, I gave up and booted into Windows to check if the hardware had a defect. In Windows it worked without issues. I upgraded the firmware using the Windows utility to do so. After doing this the scanner worked without issue also in Linux.
So, all in all: There is official Linux support for this scanner, but it seems to require a firmware upgrade. This could definitely be better handled by the Brother documentation.
Stupid sys-admin’ing, and hooray for LVM and unnecessary partitions
The scenario is: almost finished migrating from an old server to a new server. Only a few steps remain, namely
- change DNS to point to new server
- wipe disks on old server
Done in this order, one might be unlucky that ssh’ing in to wipe the disks lands you on the new server. If you don’t discover this and run the command
dd if=/dev/zero of=/dev/md2
to wipe the disks you might run it on the new server instead. BAM: you just wiped the data of your new server. Fortunately, I realised my mistake after a few seconds, and was able to recover from this with only unimportant data loss, and a little panic.
/dev/md2 is actually a LVM physical partition, of which the first part now only contains zeroes; hereunder all the meta-data. LVM reported no volumes of any kind:
root@server# pvs -v

 Scanning for physical volume names

root@server# lvs -v

 Finding all logical volumes

 No volume groups found

root@server # vgs -v

 Finding all volume groups

 No volume groups found
After a bit of Google’ing while panicking I found out LVM keeps a backup of all its metadata in /etc/lvm/backup, and that it could be rewritten to the physical volume using:
pvcreate -ff -u XXXXXX-XXXX-XXXX-XXXX-XXXX-XXXX-XXXXXX --restorefile /etc/lvm/backup/vg0 /dev/md2
where XXXXXX-XXXX-XXXX-XXXX-XXXX-XXXX-XXXXXX is the physical UUID from the backup file:
...

physical_volumes {

 pv0 {

  id = "XXXXXX-XXXX-XXXX-XXXX-XXXX-XXXX-XXXXXX"

 device = "/dev/md2" # Hint only ...
Unfortunately, I got an error:
root@server# pvcreate -ff -u XXXXXX-XXXX-XXXX-XXXX-XXXX-XXXX-XXXXXX --restorefile /etc/lvm/backup/vg0 /dev/md2

Couldn't find device with uuid XXXXXX-XXXX-XXXX-XXXX-XXXX-XXXX-XXXXXX.

Can't open /dev/md2 exclusively. Mounted filesystem?
lsof showed nothing accessing md2, but I guess something still had references to the logical volumes. I was unable to get it to work, so I decided to reboot (while making sure the system would come up, and nothing would try to mount the (non-existent) LVM volumes). After a reboot the command worked, but still no logical volumes:
root@server # pvcreate -ff -u XXXXXX-XXXX-XXXX-XXXX-XXXX-XXXX-XXXXXX --restorefile /etc/lvm/backup/vg0 /dev/md2

 Couldn't find device with uuid XXXXXX-XXXX-XXXX-XXXX-XXXX-XXXX-XXXXXX.

 Physical volume "/dev/md2" successfully created

root@server # sudo pvs

 PV       VG Fmt  Attr PSize   PFree

 /dev/md2    lvm2 a-   648.51g 648.51g

root@server # sudo lvs

 No volume groups found
Now I had a physical volume, and could use the vgcfgrestore command:
root@server # vgcfgrestore -f /etc/lvm/backup/vg0 /dev/vg0

 Restored volume group vg0

root@server # sudo lvs

 LV   VG   Attr  LSize Origin Snap% Move Log Copy% Convert

...

 home vg0 -wi-a- 20.00g
I now had my logical volumes back! Now to assess the data loss… The backup file /etc/lvm/backup/vg0 lists which order the logical volumes are stored. The first volume in my case was the “home” volume. Sure enough, it would no longer mount:
root@server # mount /dev/vg0/home /home

mount: wrong fs type, bad option, bad superblock on /dev/mapper/vg0-home,

 missing codepage or helper program, or other error

 In some cases useful info is found in syslog - try

 dmesg | tail or so
I actually had no important information on that file system, so I re-created it. Luckily the next volume was intact, and I could bring up the rest of the system without problems.
So to sum up: LVM keeps a backup of all it’s metadata that can be restored (after a reboot), but if your keyboard is faster than your brain it can be a good idea to keep an unused volume as the first logical volume 🙂
Making objdump -S find your source code
We all know the situation: We want to disassemble the most awesome pre-compiled object file, with accompanying sources, using objdump and we would like to view the assembly and C-code interleaved, so we use -S. Unfortunately, objdump fails to find the sources, and we are sad 🙁
How does objdump look for the sources? Normally the paths are hardcoded in the object file in the DWARF information. To inspect the DWARF debug info:
$ objdump --dwarf myobject.o | less
and look for DW_TAG_compile_unit sections, where the paths should exist like:
<25> DW_AT_name : C:/ARM/myfile.c
Of course, this might not be the path you have on your machine, and thus objdump gives up.
However, we can use an undocumented option to objdump: the -I or –include:
$ objdump -I ../mysources -S myobject.o | less
and voila, objdump finds the sources, inlines the C-code, and everything is awesome!
Et lille slag for ytringsfriheden
Som de fleste ved har nogle danske internet-udbydere spærret for adgangen til The Pirate Bay, bl.a. TDC. Dermed er det også blevet gjort umuligt at følge med i den nærtstående retssag mod nogle af folkene bag The Pirate Bay, hvor nyheder set fra deres synspunkt bliver publiceret på trial.thepiratebay.org.
Dette synes jeg er helt uholdbart i et rets-samfund som det danske!
Tænk hvis det bliver kutyme at anklagede ikke kan forsvare sig i medierne!
Derfor har jeg sat et mirror af bloggen, på http://tpbtrial.smartere.dk/ så folk der har en mindre friheds-elskende internet-udbyder også kan følge med i begge sider af retssagen. Den opdaterer én gang i timen.
Bemærk! Der findes ingen links til ophavsrettigt beskyttet materiale på den side jeg laver et mirror af! Det er nok det bedste eksempel på censur vi har i Danmark pt.: En side der ikke overtræder nogen som helst love, men som blot udtrykker en mening, er blevet spærret!
WordPress – mildly impressed
So, I just installed WordPress, because I was starting to have a too long mental list of things that I considered “blog-able”. My current estimate of what I will be blogging about is: Sysadmin’ing on a tight budget, Ubuntu Linux, MultiADM, various happenings in the Open Source world, and probably a bit about my everyday life as a student of Computer Science at Aalborg University, Denmark.
But back to the title of this post. For various reasons I have previously preferred other blogging software (primarily blogging software integrated with Typo3), but I finally gave in and installed WordPress. I deemed that I was simply missing out on too much: trackbacks, tags, anti-spam measures for comments. All this warranted a separate blogging system, and WordPress is pretty much the no. 1 blogging system in use.
My experience with it so far: Installation was okay, but it could have told me that the reason I didn’t get the fancy install-wizard was because I had forgot to give permissions for WordPress to modify its files. Minor nitpick: I decided to move my installation from /wordpress to just /. This resulted in all links still pointing at /wordpress. After a little detective work, and phpMyAdmin to the rescue to alter a couple of rows, and everything was working again.
But overall it seems WordPress is a pretty capable and extendable, and has a nice Web 2.0-like user interface. I’m pretty sure I will grow accustomed to it over time.
