
Floppy Disks: the best TV remote for kids
Modern TVs are very poorly suited for kids. They require using complicated remotes or mobile phones, and navigating apps that continually try to lure you into watching something else than you intended to. The usual scenario ends up with the kid feeling disempowered and asking an adult to put something on. That something ends up on auto-play because then the adult is free to do other things and the kid ends up stranded powerless and comatose in front of the TV.
Instead I wanted to build something for my 3-year old son that he could understand and use independently. It should empower him to make his own choices. It should be physical and tangible, i.e. it should be something he could touch and feel. It should also have some illusion that the actual media content was stored physically and not un-understandably in “the cloud”, meaning it should e.g. be destroyable — if you break the media there should be consequences. And there should be no auto-play: interact once and get one video.
Floppy disks are awesome!
And then I remembered the sound of a floppy disk. The mechanical click as you insert it, the whirr of the disk spinning, and the sound of the read-head moving. Floppy disks are the best storage media ever invented! Why else would the “save-icon” still be a floppy disk? Who hasn’t turned in a paper on a broken floppy disk, with the excuse ready that the floppy must have broken when the teacher asks a few days later? But kids these days have never used nor even seen a floppy disk, and I believe they deserve this experience!
Building on the experience from the Big Red Fantus-Button, I already had a framework for controlling a Chromecast, and because of the netcat | bash shenanigans it was easily extendable.
My first idea for datastorage was to use the shell of a floppy disk and floppy drive, and put in an RFID tag; this has been done a couple of times on the internet, such as RFIDisk or this RaspberryPi based RFID reader or this video covering how to embed an RFID tag in a floppy disk. But getting the floppy disk apart to put in an RFID tag and getting it back together was kinda wonky.
When working on the project in Hal9k someone remarked: “Datastorage? The floppy disk can store data!”, and a quick prototype later this worked really, really, well. Formatting the disk and storing a single small file, “autoexec.sh”, means that all the data ends up in track 0 and is read more or less immediately. It also has the benefit that everything can be checked and edited with a USB floppy disk drive; and the major benefit that all the sounds are completely authentic: click, whirrr, brrr brrr.
Autorun for floppy disks is not really a thing.
The next problem to tackle was how to detect that a disk is inserted. The concept of AutoRun from Windows 95 was a beauty: insert a CD-ROM and it would automatically start whatever was on the media. Great for convenience, quite questionably for security. While in theory floppy disks are supported for AutoRun, it turns out that floppy drives basically don’t know if a disk is inserted until the operating system tries to access it! There is a pin 34 “Disk Change” that is supposed to give this information, but this is basically a lie. None of the drives in my possession had that pin connected to anything, and the internet mostly concurs. In the end I slightly modified the drive and added a simple rolling switch, that would engage when a disk was inserted.
A floppy disk walks into a drive; the microcontroller says “hello!”
The next challenge was to read the data on a microcontroller. Helpfully, there is the Arduino FDC Floppy library by dhansel, which I must say is most excellent. Overall, this meant that the part of the project that involved reading a file from the floppy disk FAT filesystem was basically the easiest part of all!
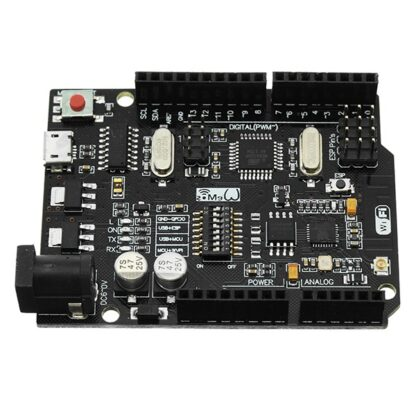
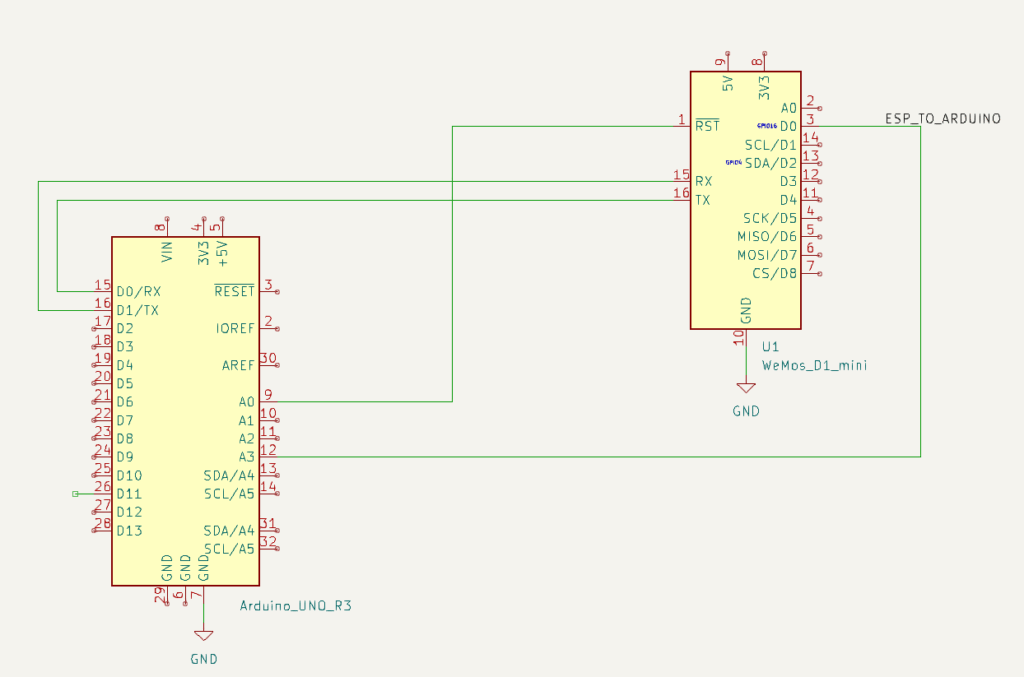
However, the Arduino FDC Floppy library is only compatible with the AVR-based Arduinos, not the ESP-based ones, because it needs to control the timing very precisely and therefore uses a healthy amount of inline assembler. This meant that I would need one AVR-based Arduino to control the floppy disk, but another ESP-based one to do the WiFi communication. Such combined boards do exist, and I ended up using such a board, but I’m not sure I would recommend it: the usage is really finagly, as you need to set the jumpers differently for programming the ATmega, or programming the ESP, or connecting the two boards serial ports together.
A remote should be battery-powered
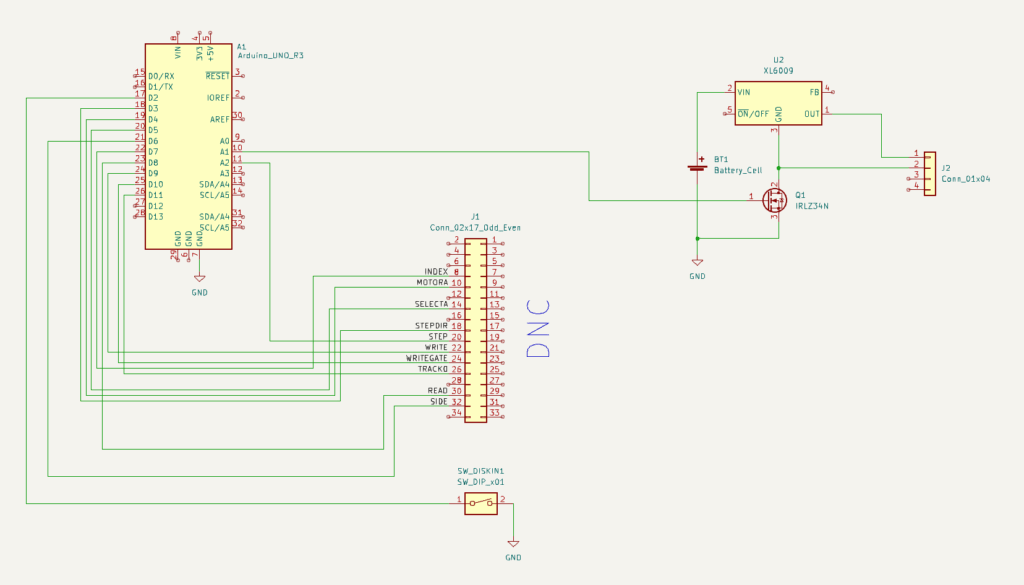
A remote control should be portable, and this means battery-powered. Driving a floppy disk of of lithium batteries was interesting. There is a large spike in current draw when the disk needs to spin up of several amperes, while the power draw afterwards is more modest, a couple of hundred milliamperes. I wanted the batteries to be 18650s, because I have those in abundance. This meant a battery voltage of 3.7V nominally, up to 4.2V for a fully charged battery; 5V is needed to spin the floppy around, so a boost DC-DC converter was needed. I used an off the shelf XL6009 step-up converter board. At this point a lot of head-scratching occurred: that initial spin-up power draw would cause the microcontroller to reset. In the end a 1000uF capacitor at the microcontroller side seemed to help but not eliminate the problem.
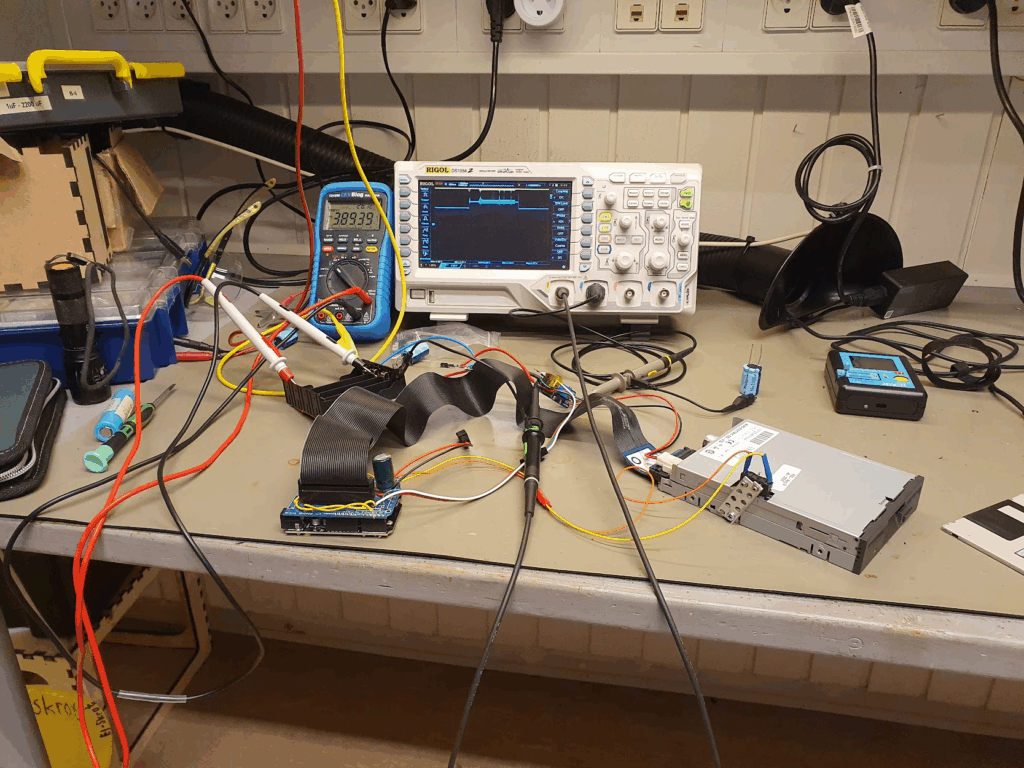
One crucial finding was that the ground side of the interface cable should absolutely not be connected to any grounds on the microcontroller side. I was using a relatively simple logic-level MOSFET, the IRLZ34N, to turn off the drive by disconnecting the ground side. If any ground is connected, the disk won’t turn off. But also: if any logic pin was being pulled to ground by the ATmega, that would also provide a path to ground. But since the ATmega cannot sink that much current this would lead to spurious resets! Obvious after the fact, but this took quite some headscratching. Setting all the logic pins to input, and thus high impedance, finally fixed the stability issues.
After fixing the stability, the next challenge was how to make both of the microcontrollers sleep. Because the ATmega sleep modes are quite a lot easier to deal with, and because the initial trigger would be the floppy inserting, I decided to make the ATmega in charge overall. Then the ESP has a very simple function: when awoken, read serial in, when a newline is found then send off that complete line via WiFi, and after 30 seconds signal to the ATmega that we’re sleeping, and go back to sleep.
The overall flow for the ATmega is then:
- A disk is inserted, this triggers a interrupt on the ATmega that wakes up.
- The ATmega resets the ESP, waking it from deep sleep.
- The ATmega sends a “diskin” message over serial to the ESP; the ESP transmits this over WiFi when available.
- The ATmega turns on the drive itself, and reads the disk contents, and just sends it over serial to the ESP.
- Spin down the disk, go to sleep.
- When the disk is ejected, send a “diskout” message over serial, resetting the ESP if needed.
- Go back to 1.
The box itself is just lasercut from MDF-board. For full details see the FloppyDiskCast Git repository.
Server-side handlers
Responding to those commands is still the netcat | bash from the Big Red Fantus-Button, which was simply extended with a few more commands and capabilities.

diskin always sends a “play” command to the Chromecast.diskout always sends a “pause” command to the Chromecast.
Other commands like dad-music are handled in one of two ways:
- Play a random video from a set, if a video from that set is not already playing: e.g.
dad-musicwill randomly play one of dad’s music tracks – gotta influence the youth! - Play the next video from a list, if a video from the list is not already playing: e.g.
fantus-maskinernewill play the next episode, and only the next episode.
Common for both is that they should be idempotent actions, and the diskin shortcut will make the media resume without having to wait for the disk contents itself to be read and processed. This means that the “play/pause” disk just contains an empty file to work.
Questionable idea meets real-world 3 year old user
The little guy quickly caught on to the idea! Much fun was had just pausing and resuming music and his Fantus TV shows. He explored and prodded, and some disks were harmed in the process. One problem that I did solve was that the read head stayed on track 0 after having read everything: this means that when the remote with disk inside it is tumbled around, the disk gets damaged at track 0. To compensate for this, I move the head to track 20 after reading has finished: any damage is then done there, where we don’t store any data. As a bonus it also plays a little more mechanic melody.
Ford 3000 Tractor Instrument Voltage Stabilizer – Mechanical PWM!

Some time ago we bought a nice used Ford 3000 tractor (3 cylinder diesel, Chief frontloader). It needed some work, and one of the items was a new wiring harness. After replacing all the wiring everything seemed to work fine, until one day all the instruments just died; this being a mechanical beast everything else kept working. After quite some investigation, I found out that the instrument fuse (the only fuse in the entire system) had blown. Replacing it just blew it again, so something was clearly wrong. This lead to taking out the so-called “instrument voltage stabilizer”, and disassembling it.
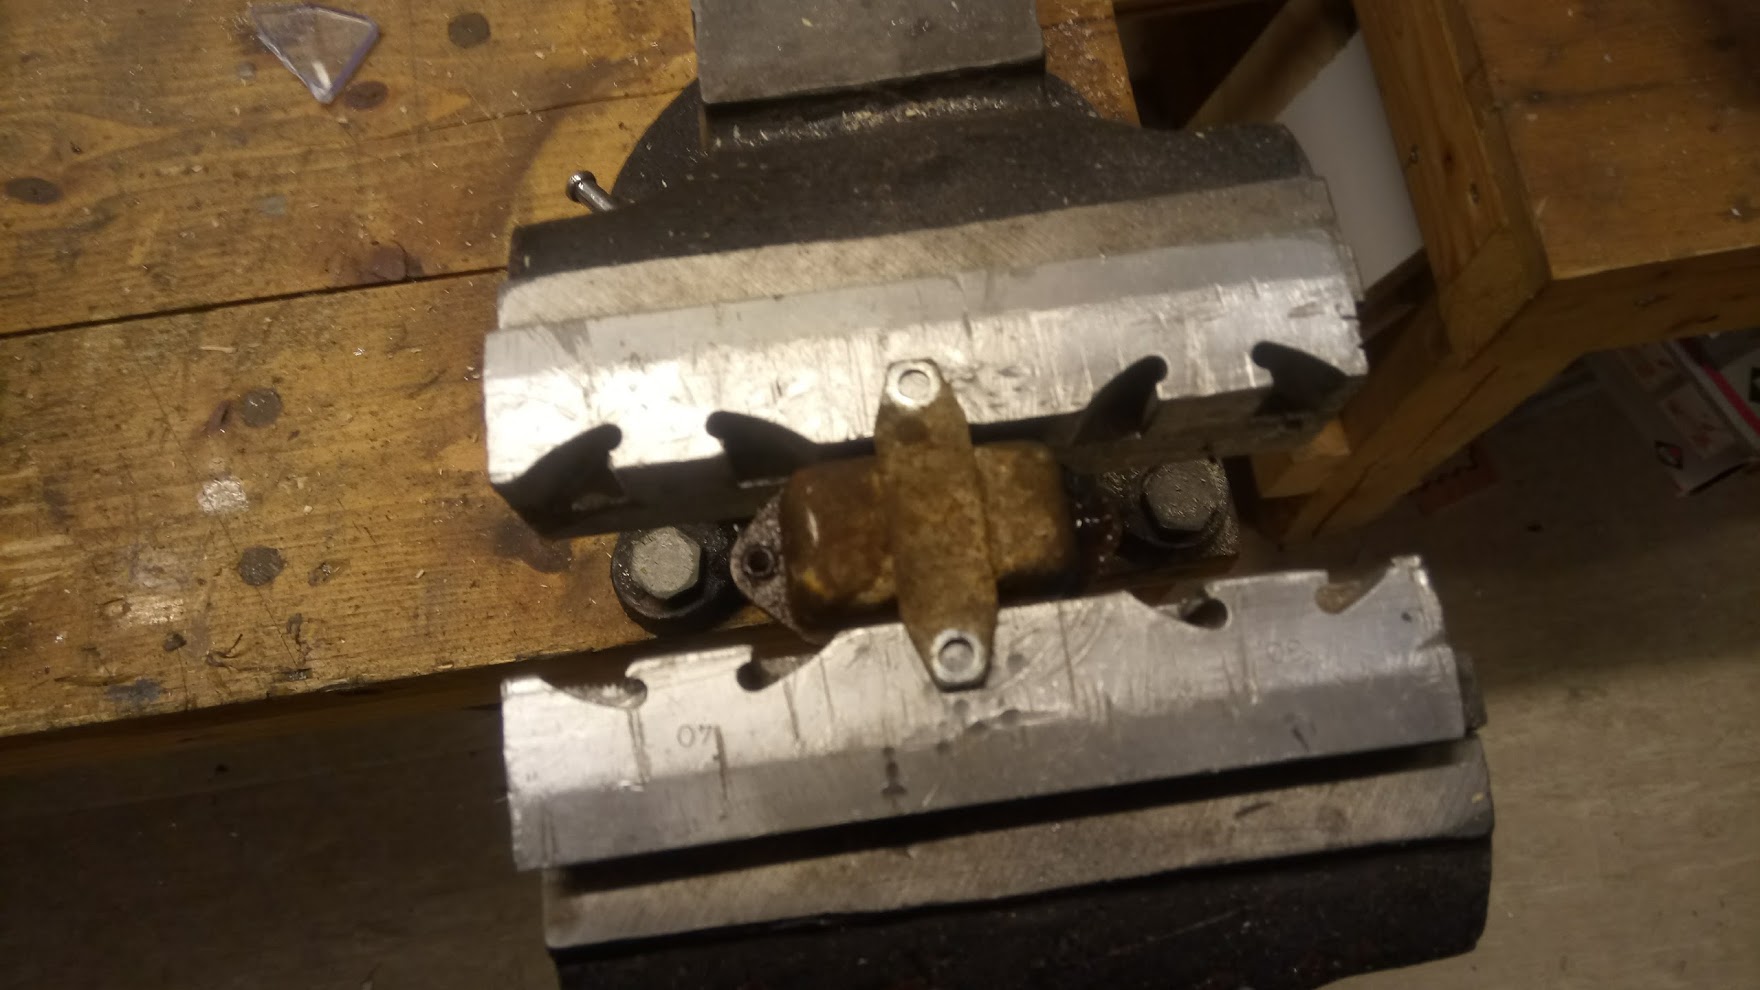
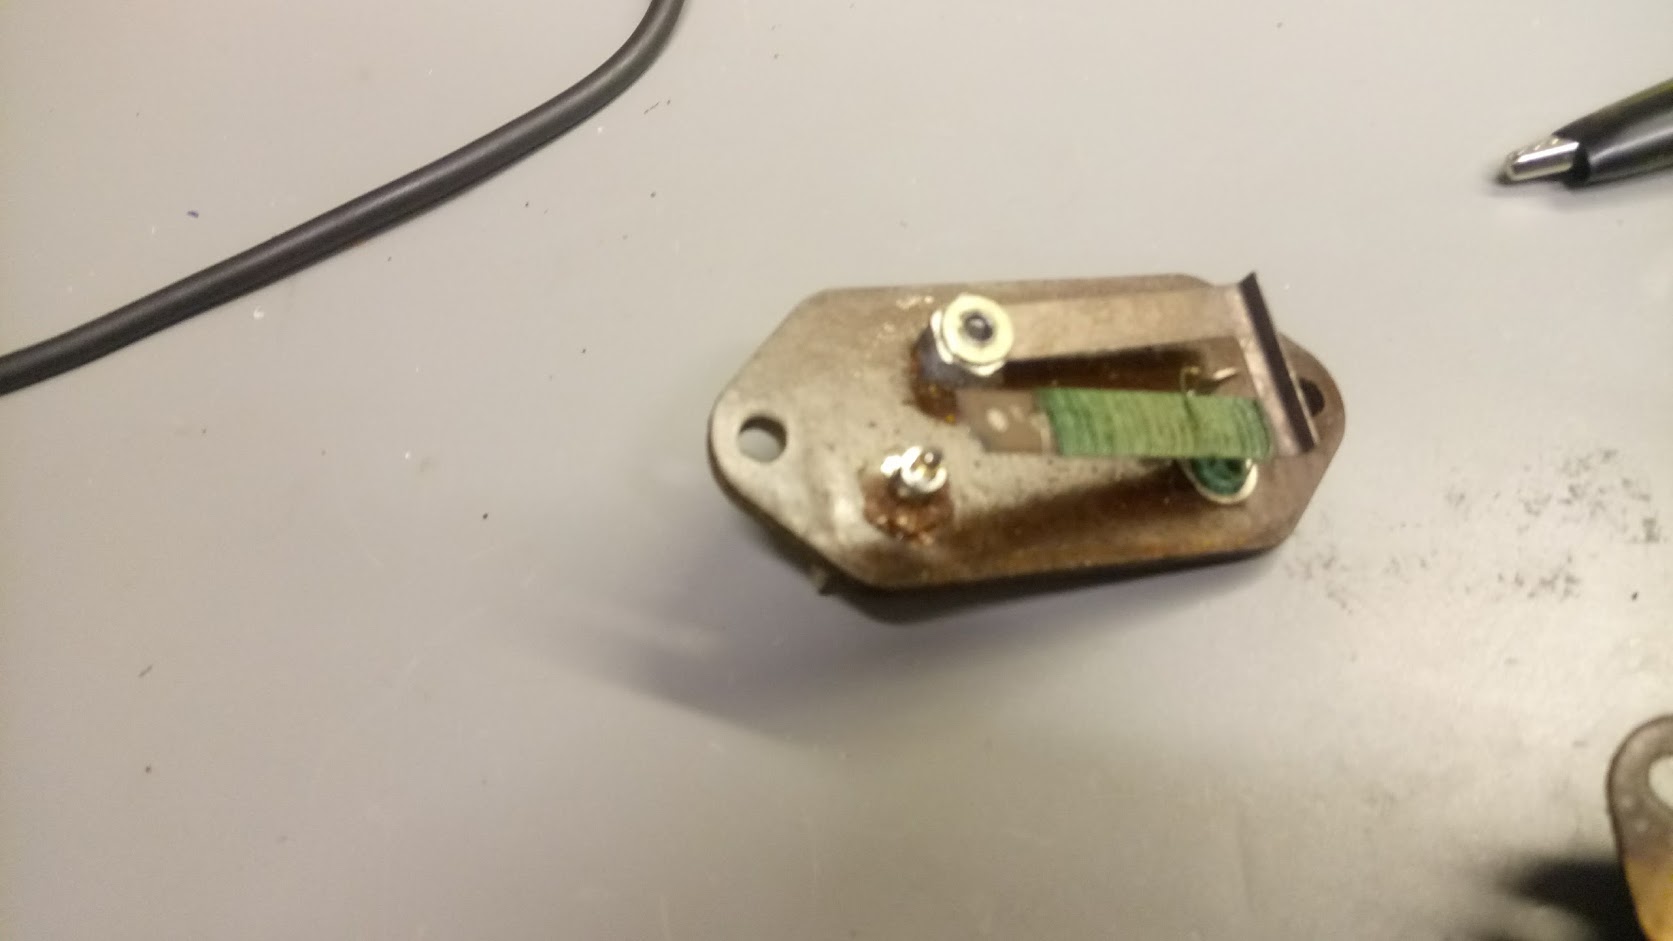
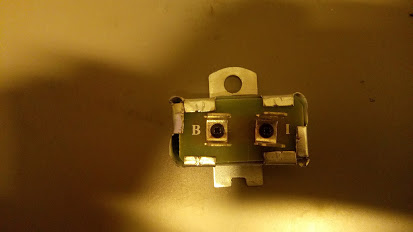
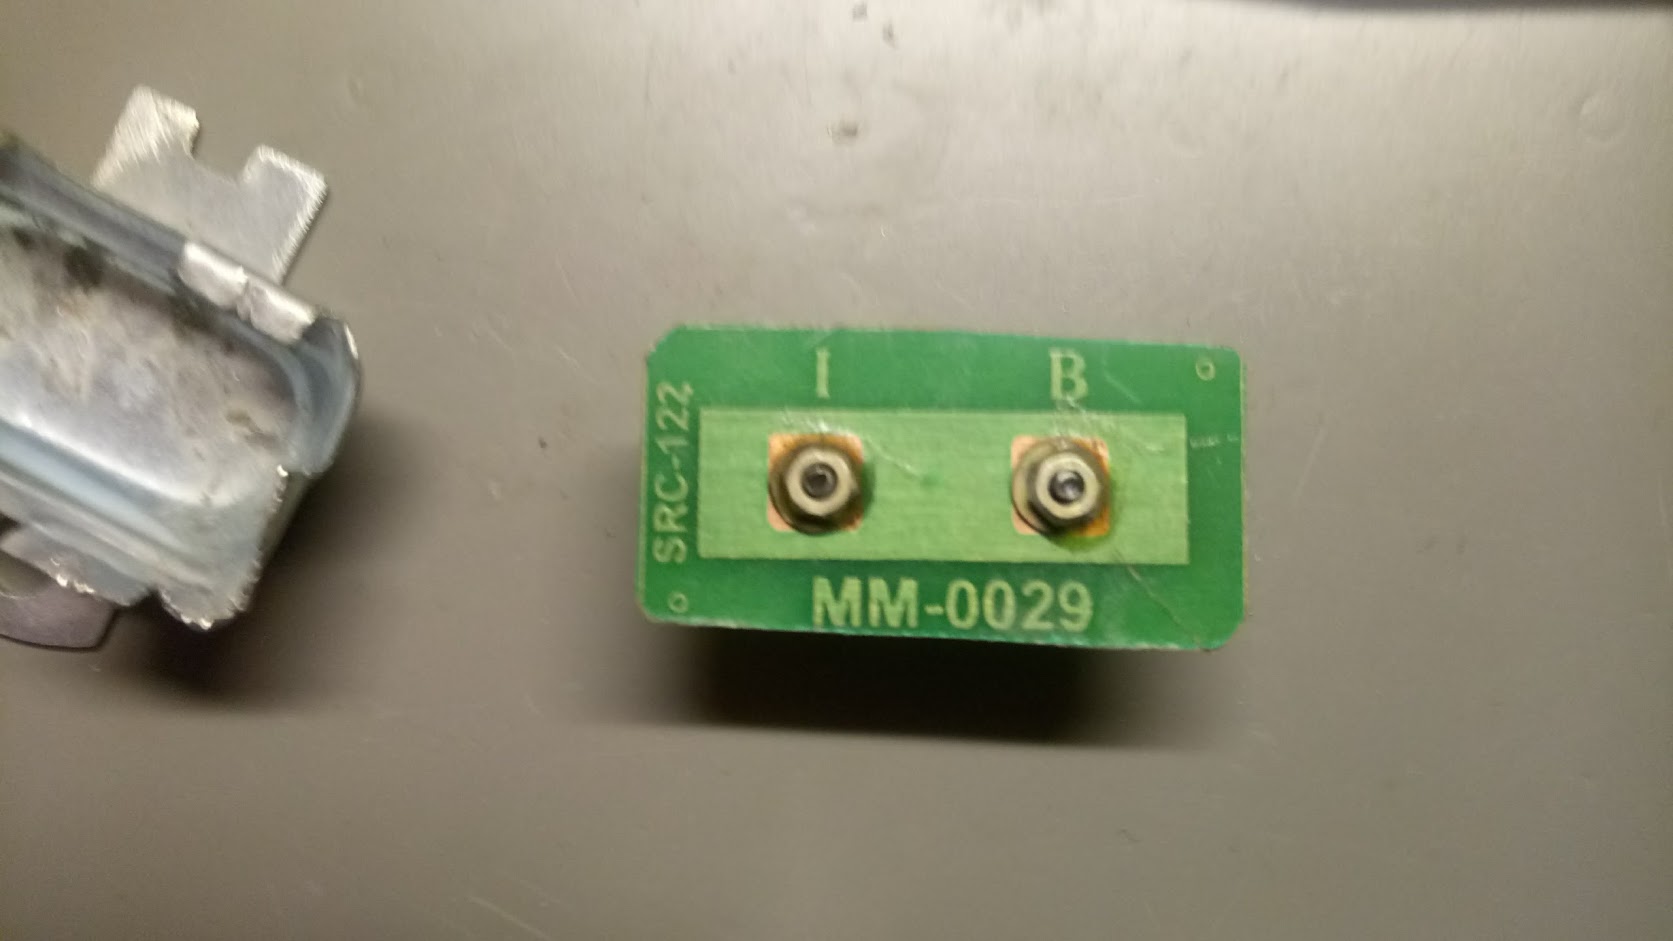
Apparently I had connected it in such a way that the arm had raised itself, and was now short-circuiting to the case. I had already ordered a replacement, but only got what was essentially a very expensive connection:
So, what was the mechanism actually doing, and is it essential? After some headscratching at Hal9k the conclusion was that it was essentially a mechanical PWM, with something like this diagram
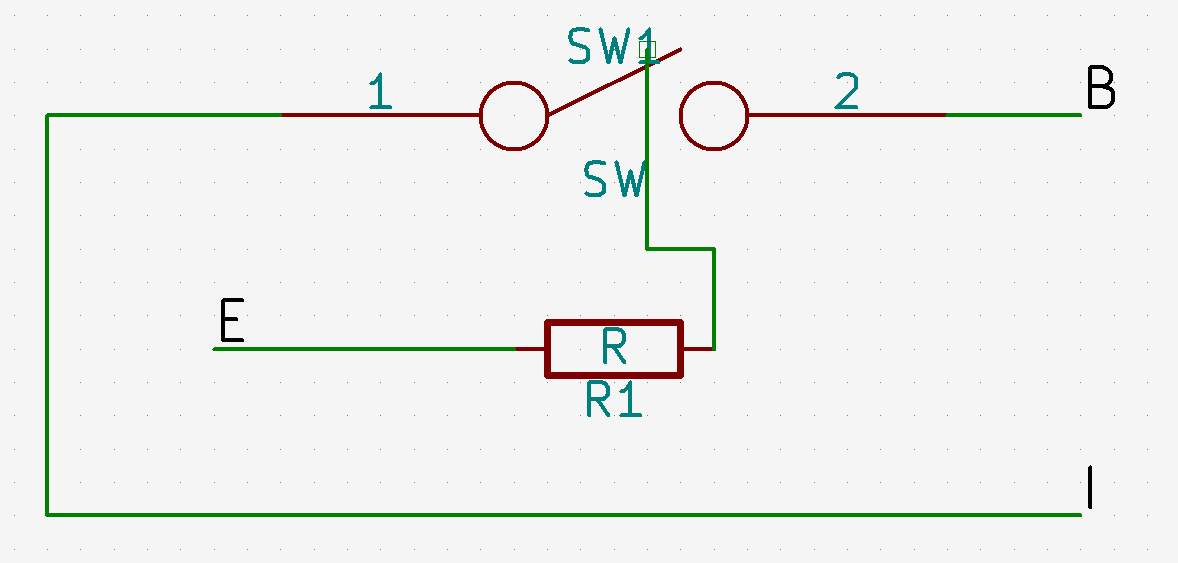
When the switch is touching the terminal current is flowing from the battery (B) to the instruments (I), but also to ground (E) through the resistor wrapped around the switch arm, causing the metal in the switch to heat up and lift. This breaks the connection, whereafter the switch cools down, and at some point makes contact again. Beautifully simple mechanism! Bending the arm back into position essentially fixed the device, and gave this waveform
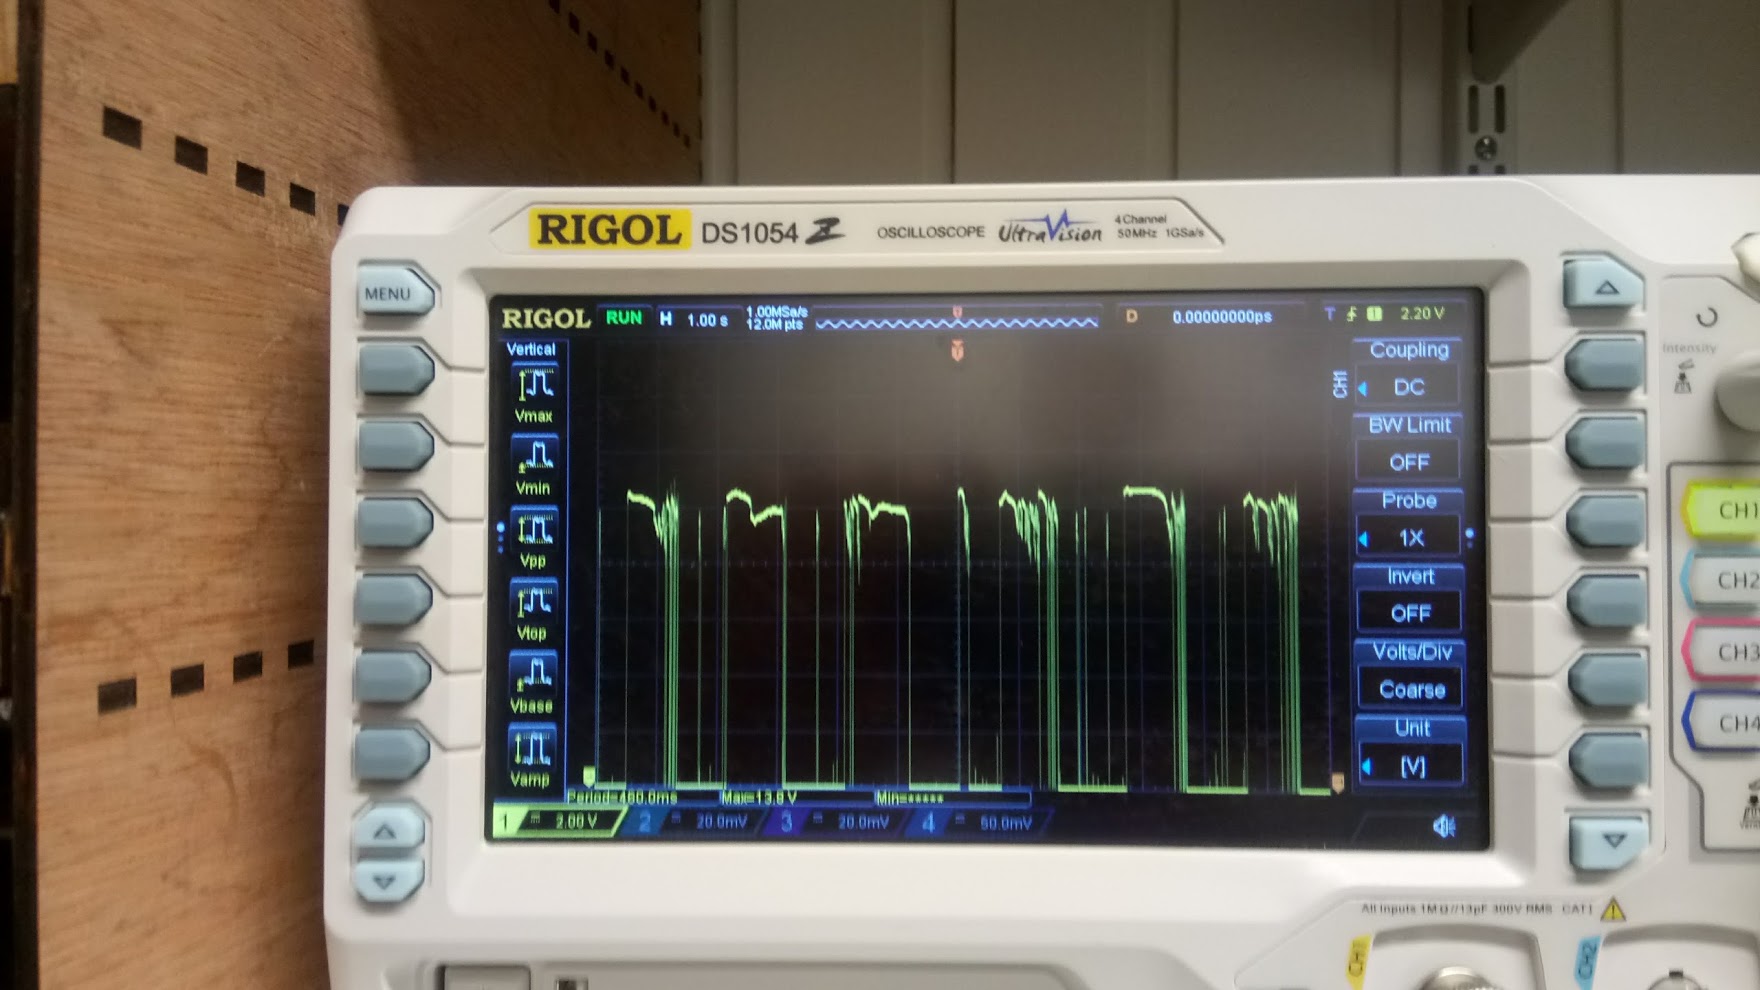
I have seen the function described online as “pulsating DC”, which is actually quite accurate. So, I re-assembled the stabilizer with some sealant, inserted in the instrument cluster of the tractor, and it has worked perfectly ever since.

The only question is why it is done this way, if just giving a constant DC voltage from the battery also seems to work? I haven’t looked into it further, but my best guess is that the instruments are using coils to move the dials slowly, and that the PWM will heat up the coils less. In conclusion: If your voltage “stabilizer” is broken, you can probably do without it, or quite easily repair it.
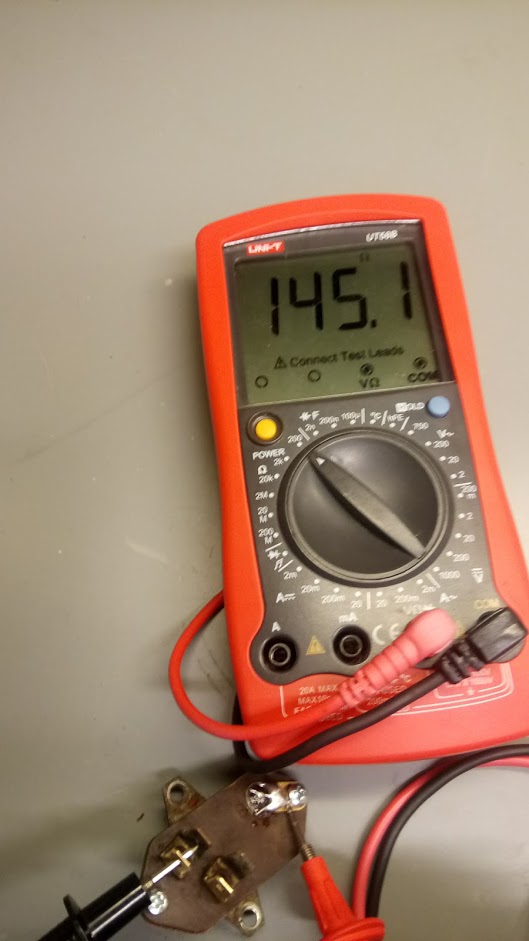
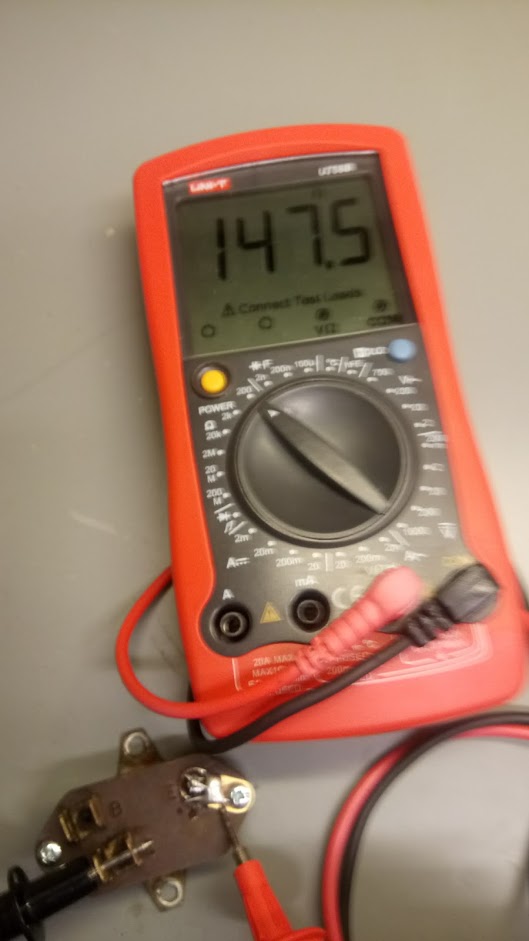
For reference, here are the resistance readings between B-E, and I-E:
Roomba 500-series Easy Scheduling using an Arduino
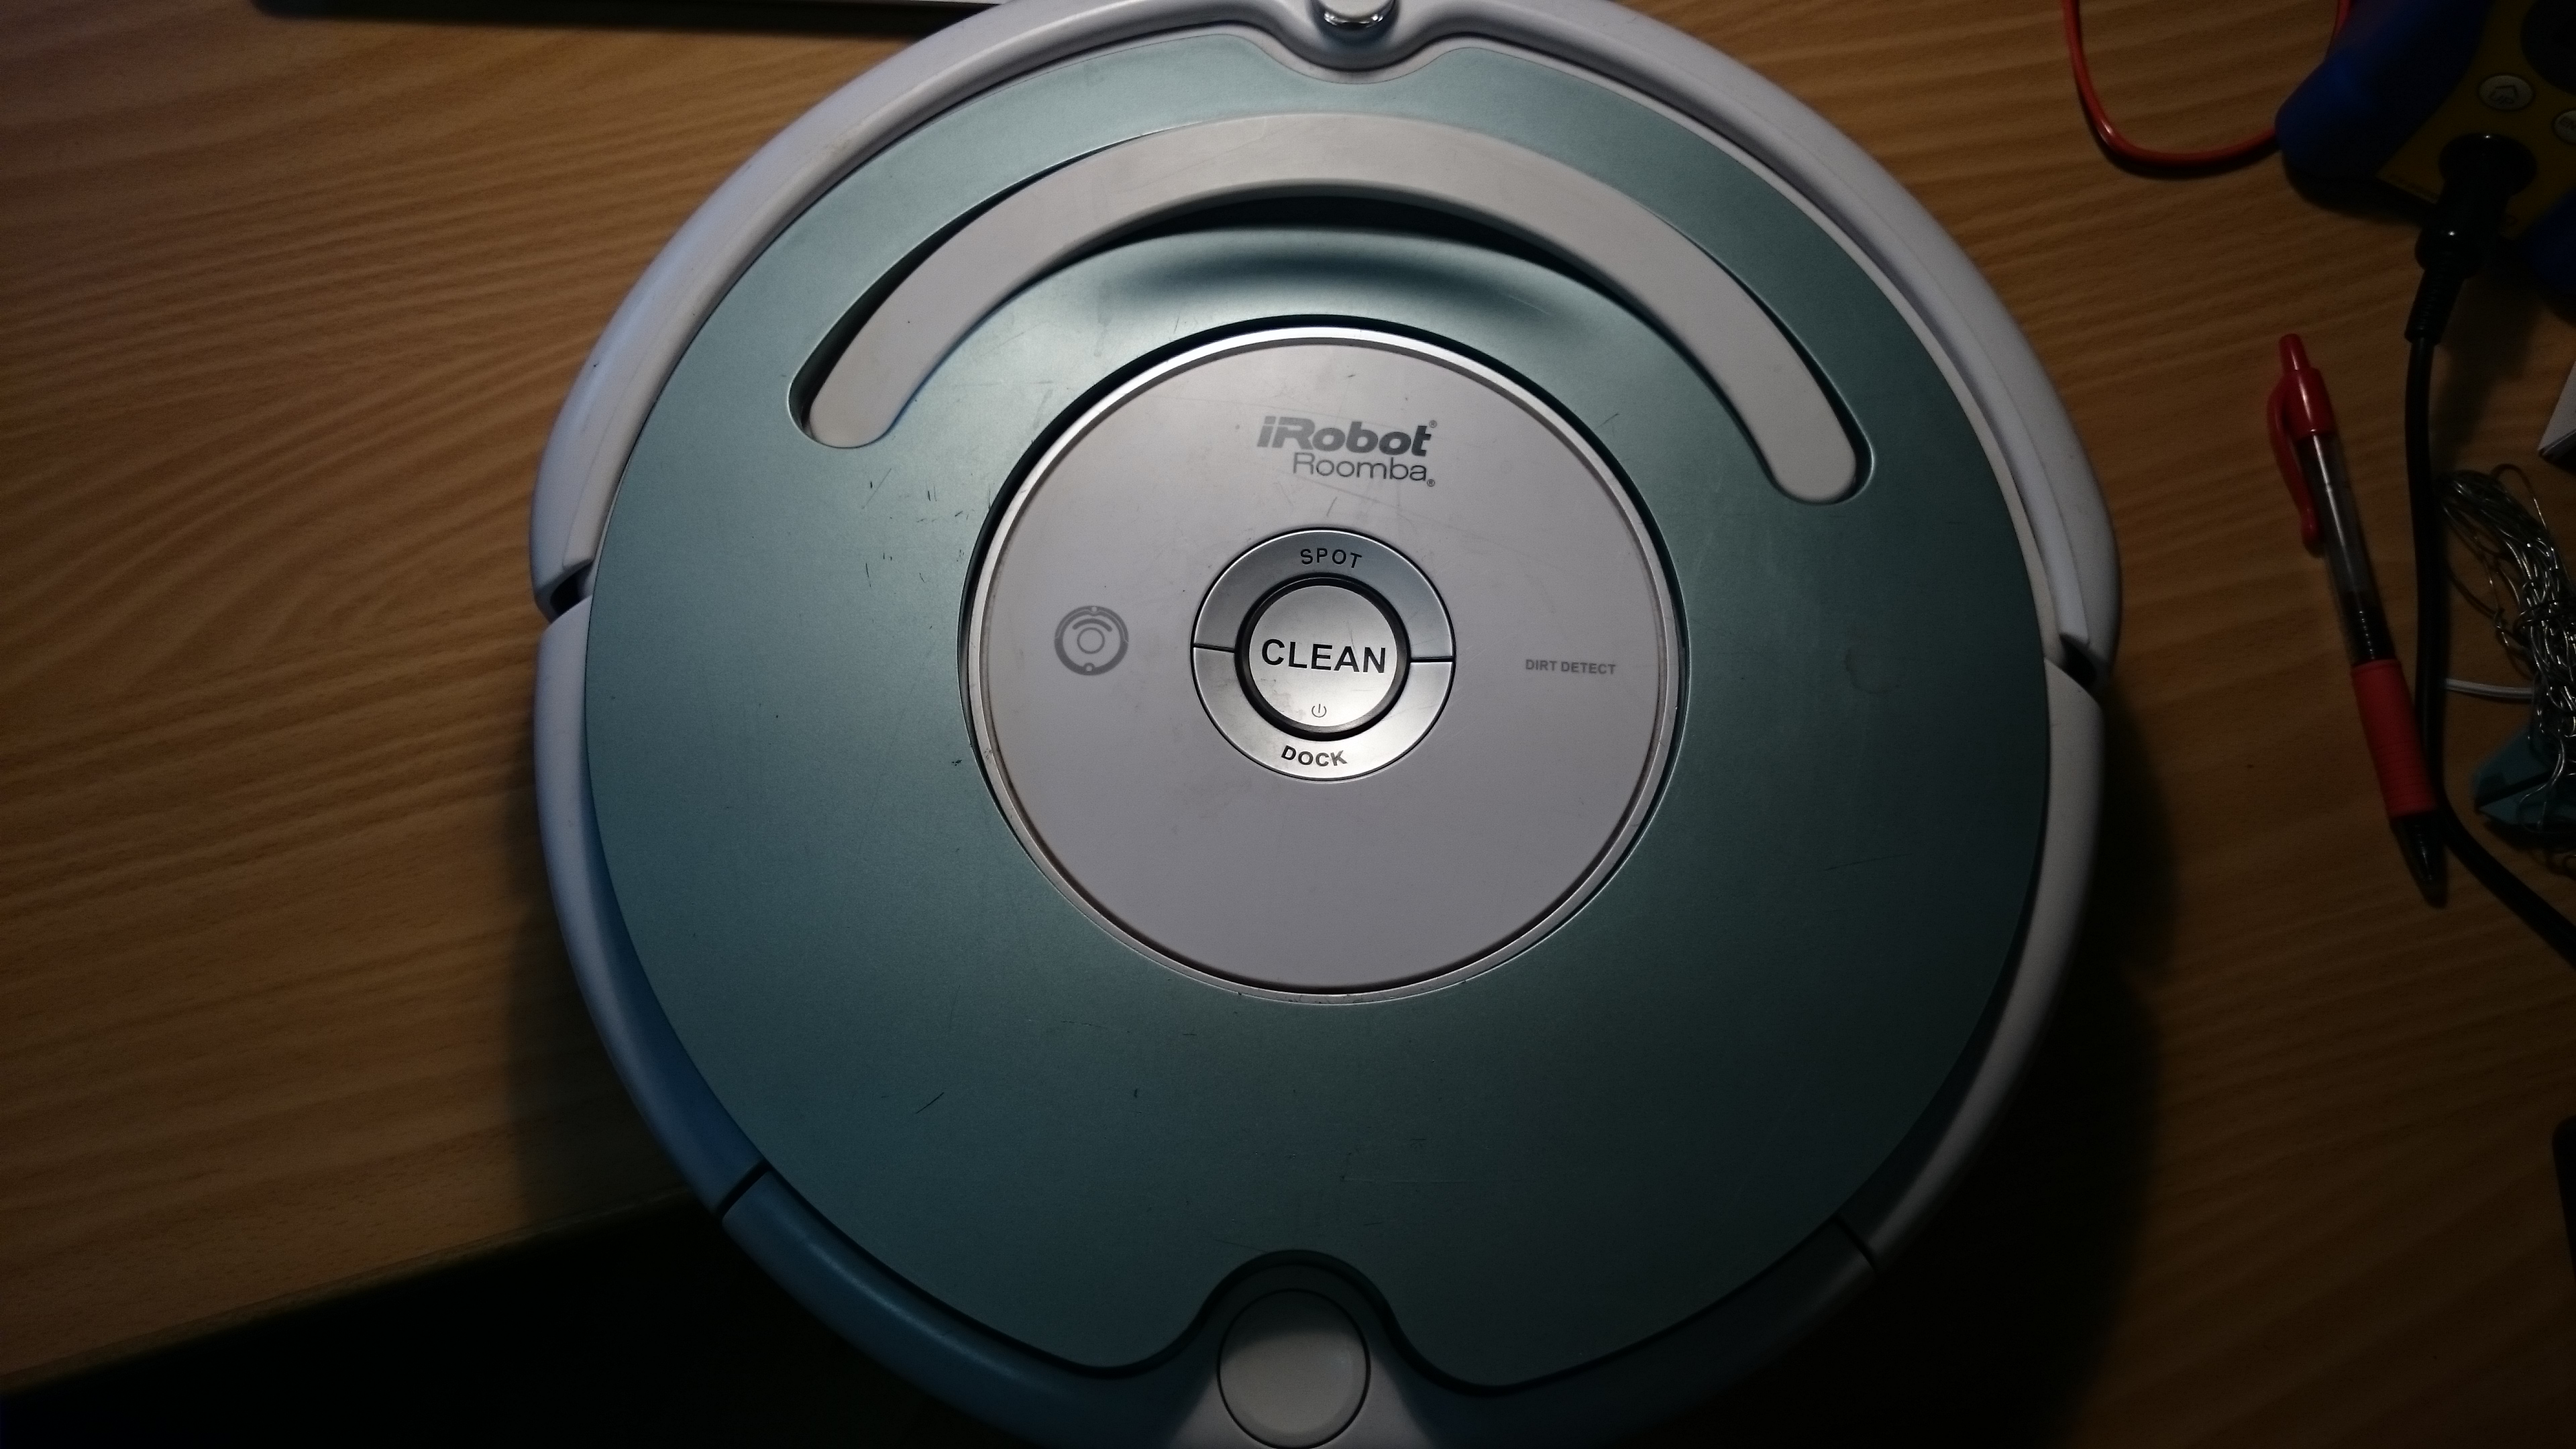
I have a iRobot Roomba 500-series vacuum cleaner robot, but without any remote, or command center or anything; alas, I have to push a button everytime I want the cleaning revolution to start 🙁
But no more! It turns out the Roomba can be programmed, quite easily, to schedule automatically, and all you need is:
- 1 Arduino
- 2 wires
The Roomba actually supports a serial protocol, the iRobot Roomba 500 Open Interface Specification, that allows remote control, driving, sensoring, and scheduling.
Finding the serial port
Remove the plastic cover. It is easiest to remove the vacuum bin, and carefully pry it off with a screwdriver.
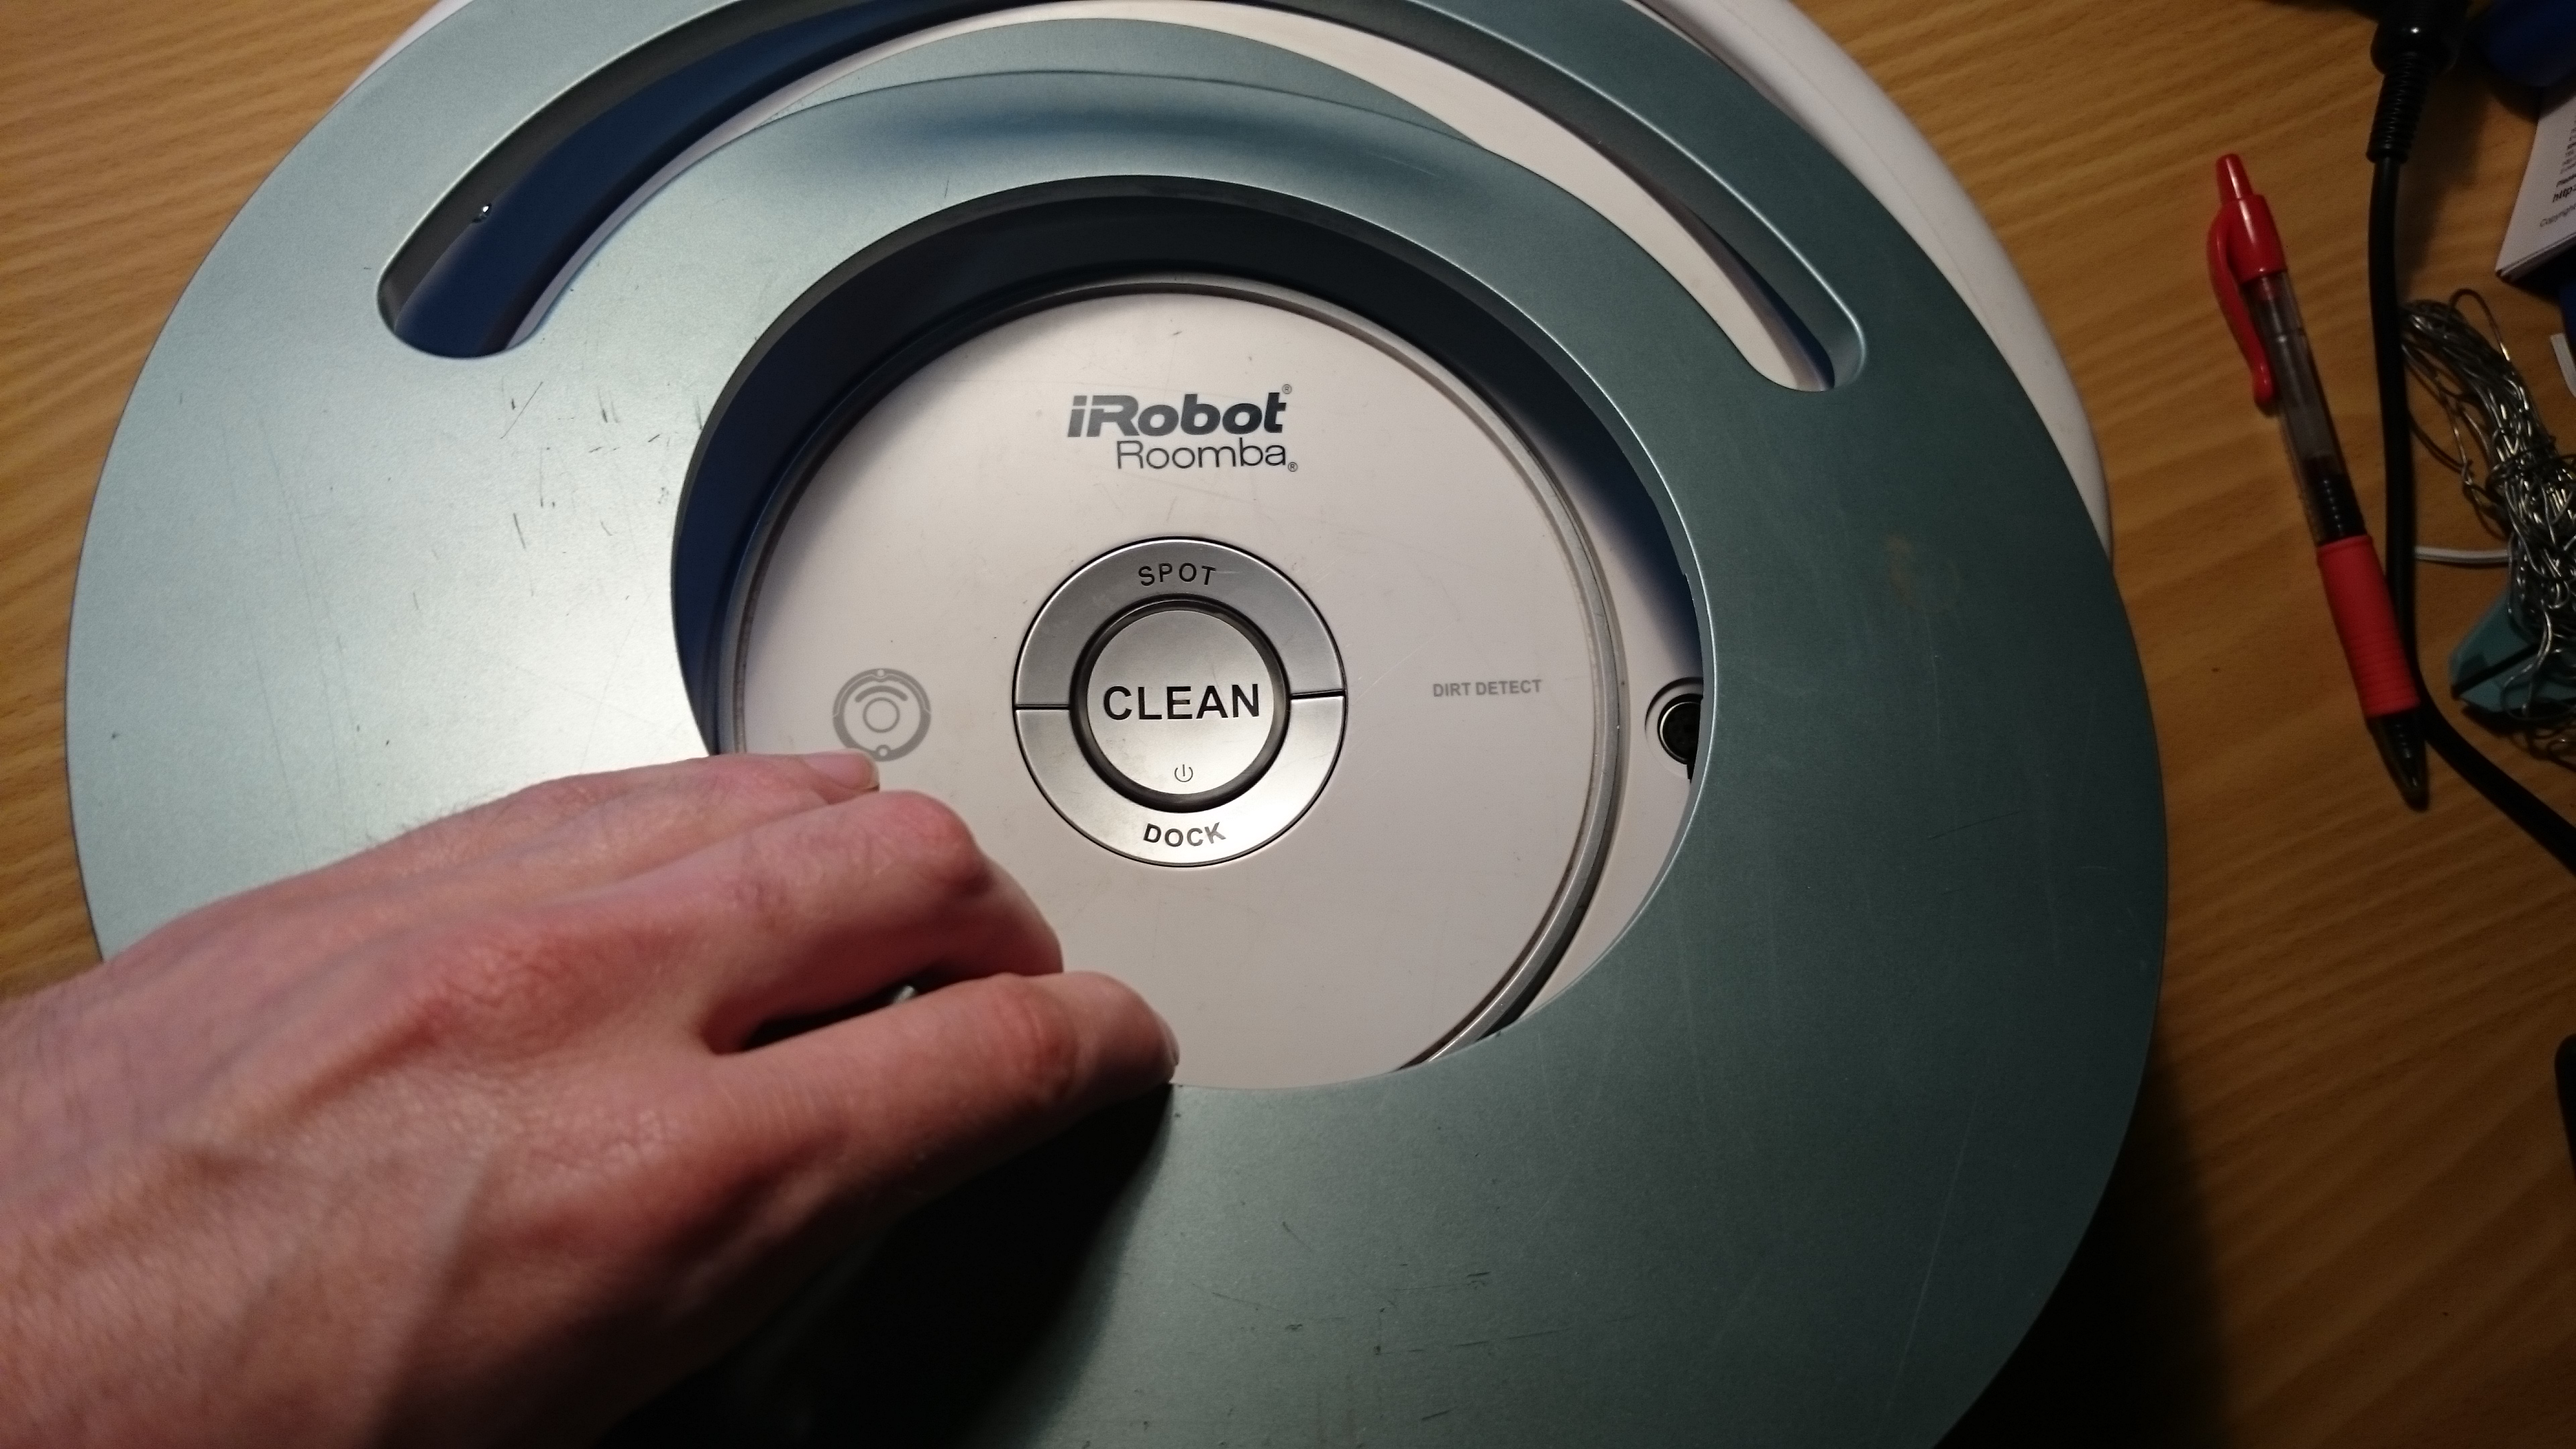

There should be a 7-pin plug, on the right side. It has the following pinout:
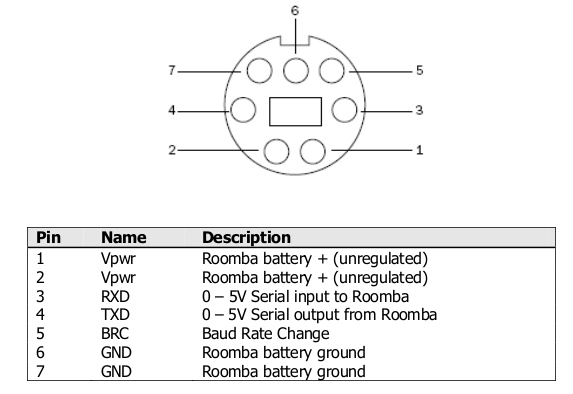
Roomba serial pinout
Program the Arduino
Use this sketch (download: roombaschedule.ino):
/*

Set a schedule on an iRobot Roomba 500 series, using just an Arduino.

Mads Chr. Olesen, 2015.

*/
const byte currentDay = 3;
// 0: Sunday, 1: Monday, 2: Tuesday, 3: Wednesday, 4: Thursday, 5: Friday, 6: Saturday
const byte currentHour = 2;
const byte currentMinute = 58;
// Schedule
const byte SUNDAY = 0x01, MONDAY = 0x02, TUESDAY = 0x04, WEDNESDAY = 0x08, THURSDAY = 0x10, FRIDAY = 0x20, SATURDAY = 0x40;
const byte daystorun = SUNDAY | MONDAY | WEDNESDAY | FRIDAY;
const byte times[14] = {
3, 0, // Sunday time
3, 0, // Monday time
3, 0, // Tuesday time
3, 0, // Wednesday time
3, 0, // Thursday time
3, 0, // Friday time
3, 0, // Saturday time
};
const int ledPin = 13;
void setup() {
Serial.begin(115200);
pinMode(ledPin, OUTPUT);
digitalWrite(ledPin, 0);
Serial.write(128); //Start
delay(1000);
Serial.write(131); //Safe mode, turns off Roomba light
delay(1000);
Serial.write(128); //Start, back to passive mode
delay(500);
//Set day time
Serial.write(168);
Serial.write(currentDay);
Serial.write(currentHour);
Serial.write(currentMinute);
delay(500);
//Set schedule
Serial.write(167);
Serial.write(daystorun);
for (int i = 0; i < 14; i++) {
Serial.write(times[i]);
}
}
void loop() {
digitalWrite(ledPin, 1);
delay(1000);
digitalWrite(ledPin, 0);
delay(1000);
}
You need to modify the variables at the top: set currentDay, currentHour, currentMinute according to the present time.
The pre-programmed schedule is to clean at 03:00 on Sunday, Monday, Wednesday and Friday. You can change this if you wish, by altering the daystorun and times variables.
If you don’t modify the schedule, the Roomba should start automatically after 2 minutes.
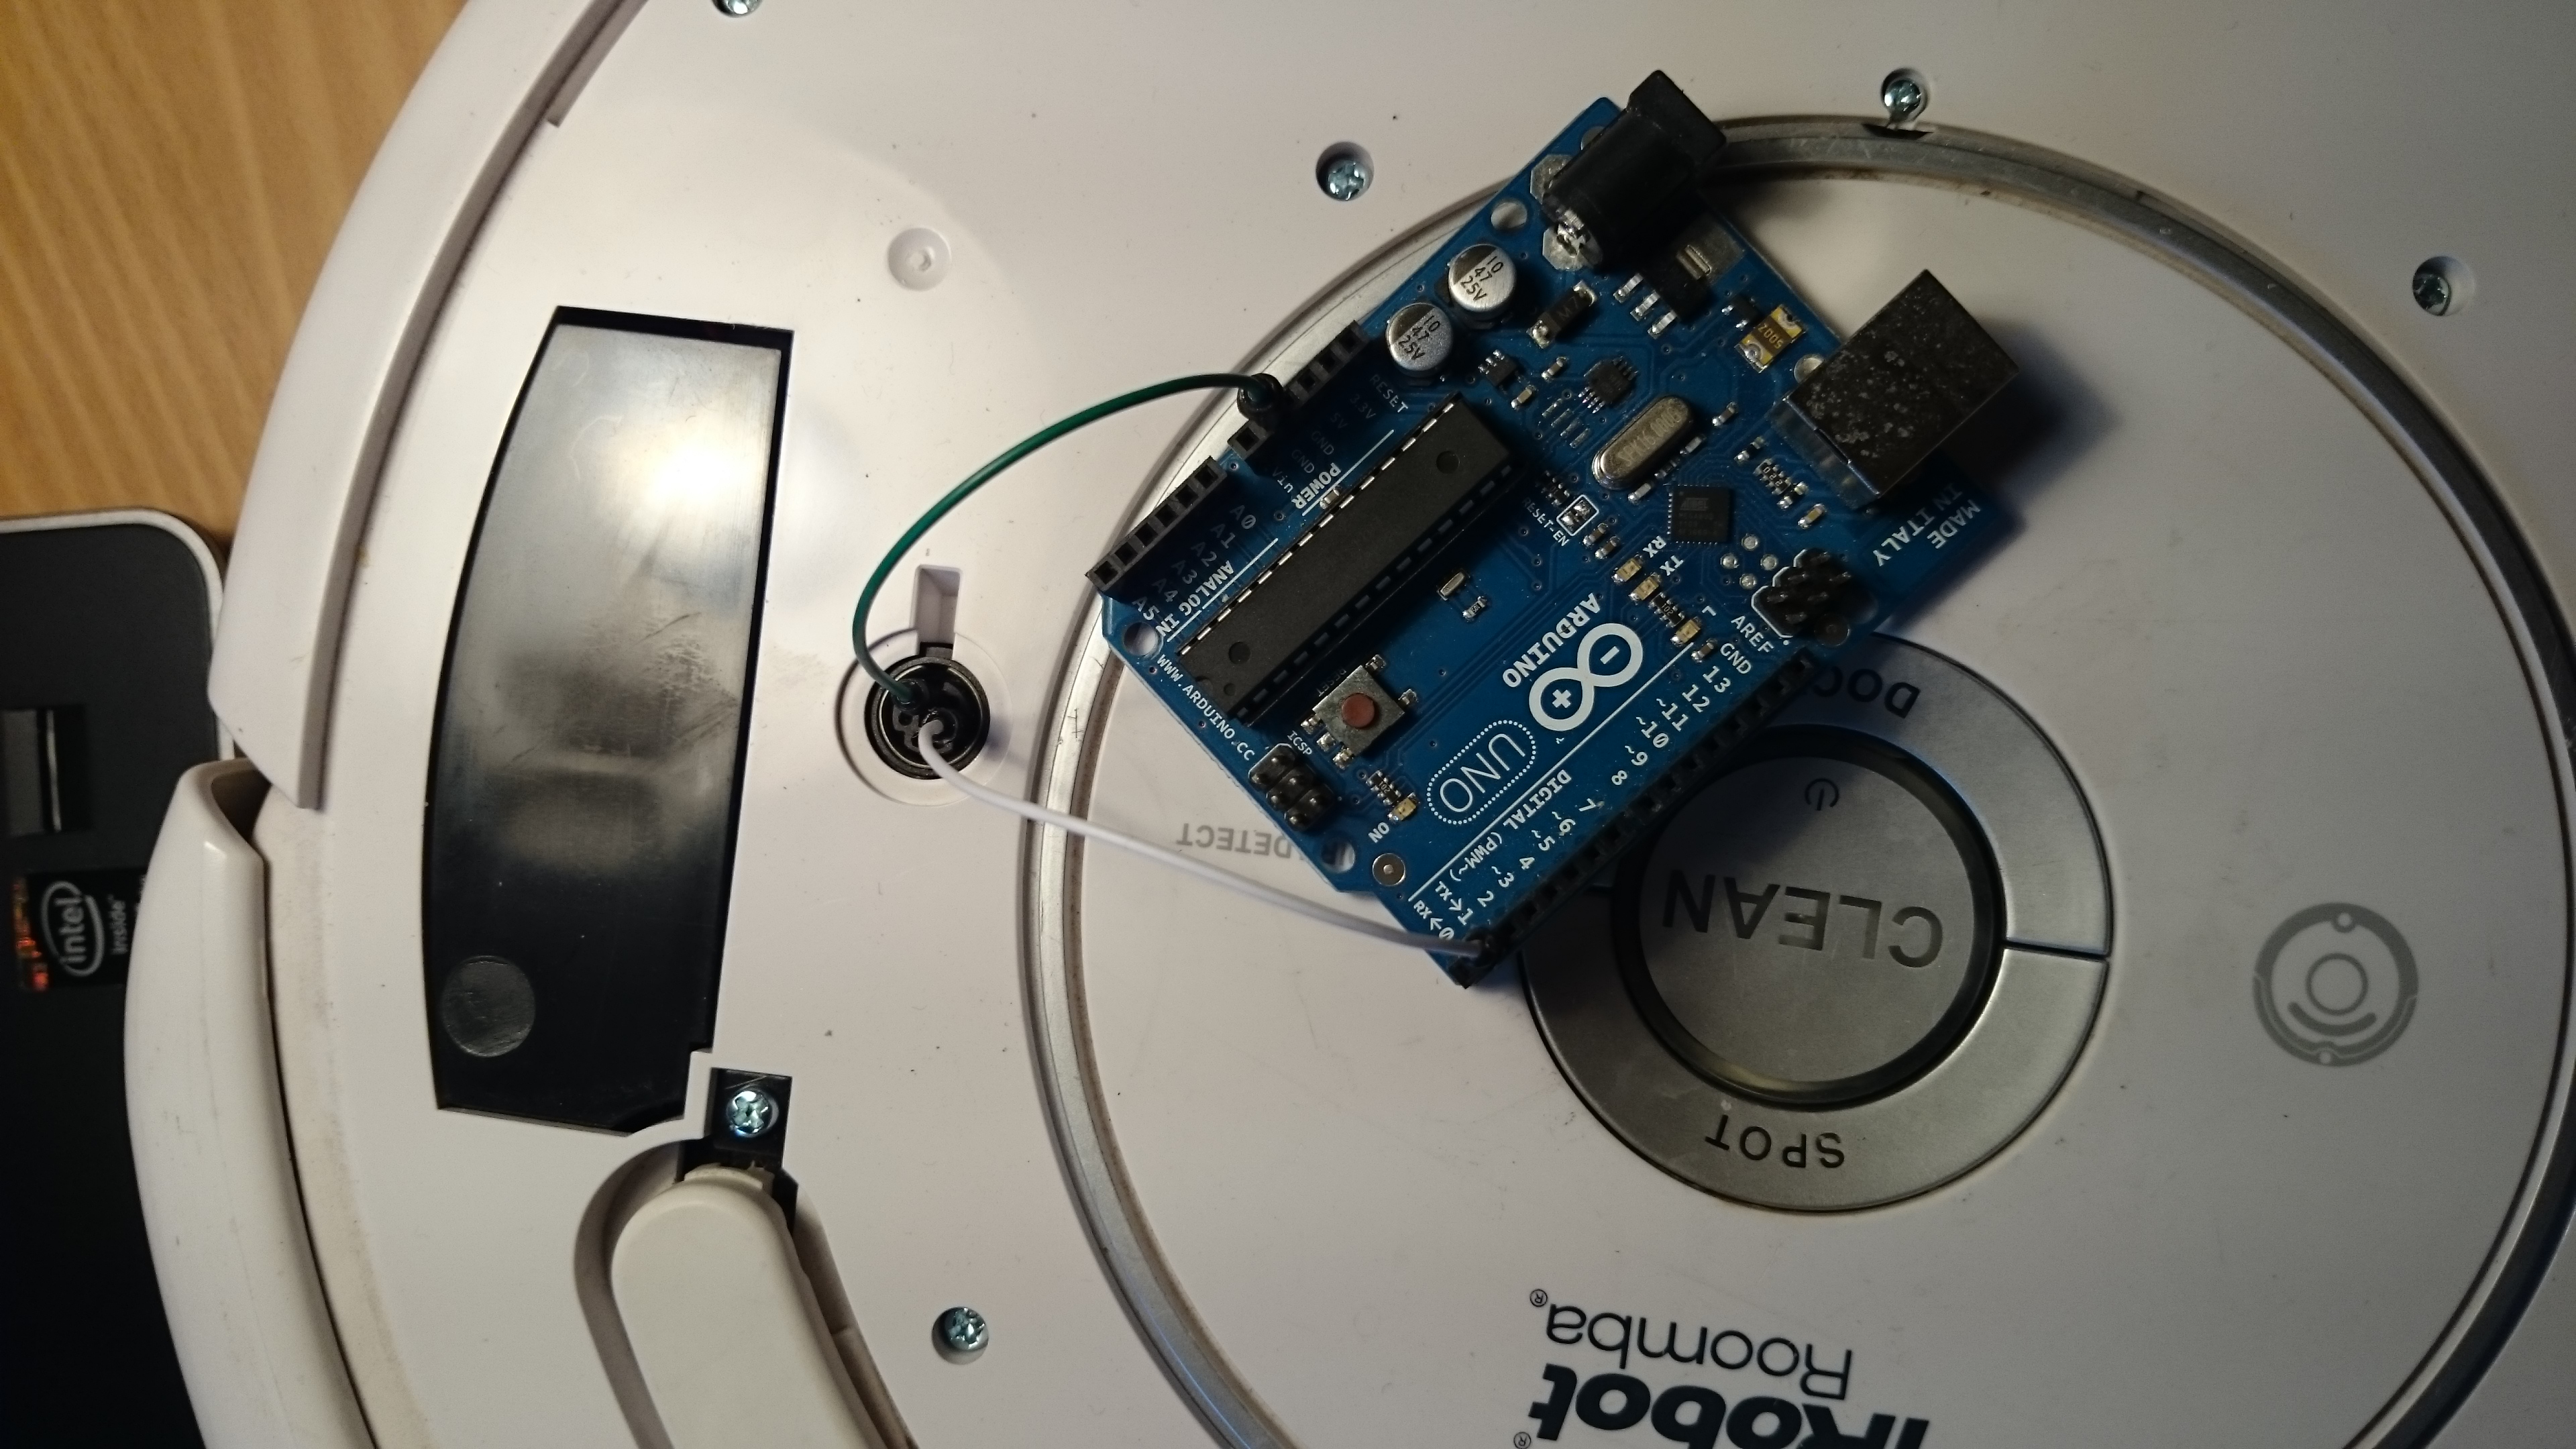
Put it all together
You should now have a partially undressed Roomba, and a programmed Arduino. Now it is time to connect them. With both unpowered, connect the following:
- Arduino GND to Roomba ground (pin 6)
- Arduino TX (pin 1 on e.g. Uno) to Roomba RX (pin 3)
It should look like this:
Now, the moment of truth. Press the “CLEAN” button on the Roomba, the light should go on. Plug in the USB for the Arduino. The Roomba light should turn off briefly, and after a few seconds the Arduino should blink it’s LED. The schedule is now programmed, all done!
Brother DS-620 on Linux
UPDATE: The drivers were temporarily unavailable; they seem to be up again, at least on the Brother US site: http://support.brother.com/g/b/downloadlist.aspx?c=us&lang=en&prod=ds620_all&os=128
I recently bought a Brother DS-620 document scanner that supposedly had support for Linux. It turns out it did, but only after a few quirks. I installed the official Linux drivers, and tried to scan a document using a GUI scanning application. Things were hanging and generally very unresponsive. I checked with the SANE command line tools, e.g. “sane-find-scanner”. It turns out things were indeed working, albeit very slowly. In dmesg I found a lot of messages like:
Jan 29 22:52:13 mchro-laptop kernel: [39172.165644] usb 2-1.3: reset high-speed USB device number 32 using ehci-pci

Jan 29 22:52:13 mchro-laptop kernel: [39172.333832] usb 2-1.3: reset high-speed USB device number 32 using ehci-pci

Jan 29 22:52:13 mchro-laptop kernel: [39172.501677] usb 2-1.3: reset high-speed USB device number 32 using ehci-pci

Jan 29 22:52:13 mchro-laptop kernel: [39172.669712] usb 2-1.3: reset high-speed USB device number 32 using ehci-pci

Jan 29 22:52:13 mchro-laptop kernel: [39172.837679] usb 2-1.3: reset high-speed USB device number 32 using ehci-pci
repeating several times every seconds. At this stage I was thinking that the Linux support was very crappy. After quite a lot of mucking around playing with capturing USB packets using Wireshark, it seemed the device itself was requesting a reset, and the Linux kernel was resetting it approximately 200ms later. Reading some Linux source code, and playing with USB quirks in Linux solved nothing.
Finally, I gave up and booted into Windows to check if the hardware had a defect. In Windows it worked without issues. I upgraded the firmware using the Windows utility to do so. After doing this the scanner worked without issue also in Linux.
So, all in all: There is official Linux support for this scanner, but it seems to require a firmware upgrade. This could definitely be better handled by the Brother documentation.
Stupid sys-admin’ing, and hooray for LVM and unnecessary partitions
The scenario is: almost finished migrating from an old server to a new server. Only a few steps remain, namely
- change DNS to point to new server
- wipe disks on old server
Done in this order, one might be unlucky that ssh’ing in to wipe the disks lands you on the new server. If you don’t discover this and run the command
dd if=/dev/zero of=/dev/md2
to wipe the disks you might run it on the new server instead. BAM: you just wiped the data of your new server. Fortunately, I realised my mistake after a few seconds, and was able to recover from this with only unimportant data loss, and a little panic.
/dev/md2 is actually a LVM physical partition, of which the first part now only contains zeroes; hereunder all the meta-data. LVM reported no volumes of any kind:
root@server# pvs -v

 Scanning for physical volume names

root@server# lvs -v

 Finding all logical volumes

 No volume groups found

root@server # vgs -v

 Finding all volume groups

 No volume groups found
After a bit of Google’ing while panicking I found out LVM keeps a backup of all its metadata in /etc/lvm/backup, and that it could be rewritten to the physical volume using:
pvcreate -ff -u XXXXXX-XXXX-XXXX-XXXX-XXXX-XXXX-XXXXXX --restorefile /etc/lvm/backup/vg0 /dev/md2
where XXXXXX-XXXX-XXXX-XXXX-XXXX-XXXX-XXXXXX is the physical UUID from the backup file:
...

physical_volumes {

 pv0 {

  id = "XXXXXX-XXXX-XXXX-XXXX-XXXX-XXXX-XXXXXX"

 device = "/dev/md2" # Hint only ...
Unfortunately, I got an error:
root@server# pvcreate -ff -u XXXXXX-XXXX-XXXX-XXXX-XXXX-XXXX-XXXXXX --restorefile /etc/lvm/backup/vg0 /dev/md2

Couldn't find device with uuid XXXXXX-XXXX-XXXX-XXXX-XXXX-XXXX-XXXXXX.

Can't open /dev/md2 exclusively. Mounted filesystem?
lsof showed nothing accessing md2, but I guess something still had references to the logical volumes. I was unable to get it to work, so I decided to reboot (while making sure the system would come up, and nothing would try to mount the (non-existent) LVM volumes). After a reboot the command worked, but still no logical volumes:
root@server # pvcreate -ff -u XXXXXX-XXXX-XXXX-XXXX-XXXX-XXXX-XXXXXX --restorefile /etc/lvm/backup/vg0 /dev/md2

 Couldn't find device with uuid XXXXXX-XXXX-XXXX-XXXX-XXXX-XXXX-XXXXXX.

 Physical volume "/dev/md2" successfully created

root@server # sudo pvs

 PV       VG Fmt  Attr PSize   PFree

 /dev/md2    lvm2 a-   648.51g 648.51g

root@server # sudo lvs

 No volume groups found
Now I had a physical volume, and could use the vgcfgrestore command:
root@server # vgcfgrestore -f /etc/lvm/backup/vg0 /dev/vg0

 Restored volume group vg0

root@server # sudo lvs

 LV   VG   Attr  LSize Origin Snap% Move Log Copy% Convert

...

 home vg0 -wi-a- 20.00g
I now had my logical volumes back! Now to assess the data loss… The backup file /etc/lvm/backup/vg0 lists which order the logical volumes are stored. The first volume in my case was the “home” volume. Sure enough, it would no longer mount:
root@server # mount /dev/vg0/home /home

mount: wrong fs type, bad option, bad superblock on /dev/mapper/vg0-home,

 missing codepage or helper program, or other error

 In some cases useful info is found in syslog - try

 dmesg | tail or so
I actually had no important information on that file system, so I re-created it. Luckily the next volume was intact, and I could bring up the rest of the system without problems.
So to sum up: LVM keeps a backup of all it’s metadata that can be restored (after a reboot), but if your keyboard is faster than your brain it can be a good idea to keep an unused volume as the first logical volume 🙂
Making objdump -S find your source code
We all know the situation: We want to disassemble the most awesome pre-compiled object file, with accompanying sources, using objdump and we would like to view the assembly and C-code interleaved, so we use -S. Unfortunately, objdump fails to find the sources, and we are sad 🙁
How does objdump look for the sources? Normally the paths are hardcoded in the object file in the DWARF information. To inspect the DWARF debug info:
$ objdump --dwarf myobject.o | less
and look for DW_TAG_compile_unit sections, where the paths should exist like:
<25> DW_AT_name : C:/ARM/myfile.c
Of course, this might not be the path you have on your machine, and thus objdump gives up.
However, we can use an undocumented option to objdump: the -I or –include:
$ objdump -I ../mysources -S myobject.o | less
and voila, objdump finds the sources, inlines the C-code, and everything is awesome!
Et lille slag for ytringsfriheden
Som de fleste ved har nogle danske internet-udbydere spærret for adgangen til The Pirate Bay, bl.a. TDC. Dermed er det også blevet gjort umuligt at følge med i den nærtstående retssag mod nogle af folkene bag The Pirate Bay, hvor nyheder set fra deres synspunkt bliver publiceret på trial.thepiratebay.org.
Dette synes jeg er helt uholdbart i et rets-samfund som det danske!
Tænk hvis det bliver kutyme at anklagede ikke kan forsvare sig i medierne!
Derfor har jeg sat et mirror af bloggen, på http://tpbtrial.smartere.dk/ så folk der har en mindre friheds-elskende internet-udbyder også kan følge med i begge sider af retssagen. Den opdaterer én gang i timen.
Bemærk! Der findes ingen links til ophavsrettigt beskyttet materiale på den side jeg laver et mirror af! Det er nok det bedste eksempel på censur vi har i Danmark pt.: En side der ikke overtræder nogen som helst love, men som blot udtrykker en mening, er blevet spærret!
WordPress – mildly impressed
So, I just installed WordPress, because I was starting to have a too long mental list of things that I considered “blog-able”. My current estimate of what I will be blogging about is: Sysadmin’ing on a tight budget, Ubuntu Linux, MultiADM, various happenings in the Open Source world, and probably a bit about my everyday life as a student of Computer Science at Aalborg University, Denmark.
But back to the title of this post. For various reasons I have previously preferred other blogging software (primarily blogging software integrated with Typo3), but I finally gave in and installed WordPress. I deemed that I was simply missing out on too much: trackbacks, tags, anti-spam measures for comments. All this warranted a separate blogging system, and WordPress is pretty much the no. 1 blogging system in use.
My experience with it so far: Installation was okay, but it could have told me that the reason I didn’t get the fancy install-wizard was because I had forgot to give permissions for WordPress to modify its files. Minor nitpick: I decided to move my installation from /wordpress to just /. This resulted in all links still pointing at /wordpress. After a little detective work, and phpMyAdmin to the rescue to alter a couple of rows, and everything was working again.
But overall it seems WordPress is a pretty capable and extendable, and has a nice Web 2.0-like user interface. I’m pretty sure I will grow accustomed to it over time.